What is Awards and Grants?
As a part of the UK Government's modernisation and evolution of the welfare scheme, the white paper Universal Credit: Welfare that Works set out that the administration of the Social Fund's Crisis Loans and Community Care Grants would be devolved to local authorities. The DWP and Scottish Government have stated that local authorities are better equipped and have better local knowledge to deal with applications from citizens in crisis or in need of assistance leaving care and in Scotland this will be the case for at least 1 year.
In many authorities, it is felt that the natural place for a discretionary assessment and award would be the benefits department, as they are familiar with means based assessments in the guise of CTB/HB as well as discretionary assessments with DHP. However, in other local authorities, Social Care departments familiar with Financial Assessments and understand the customer's circumstances and leaving care would be better placed to manage this.
Consequently, the devolved Social Fund will be dealt with by different departments depending upon the decisions made within the council. The ironic thing about the shift to Housing Benefit departments in particular is that they are already facing huge legislative changes in Council Tax Benefit (replaced with Local Council Tax Support/Reduction), massive budget cuts and have not processed these claims before and do not know the real/expected volumes to expect. Therefore the administration of this new service will need to be as effective and as geared up to the digital channel as possible in order to cater for this whilst taking into account the challenges local authorities face.
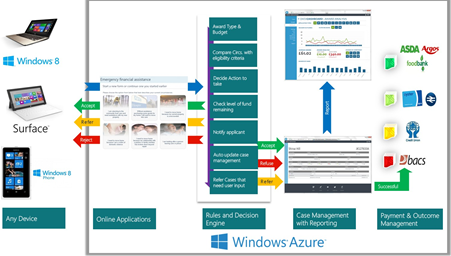
Social Fund Awards and Grants is a revolutionary solution to manage the service delivery of the newly devolved local welfare fund, which local authorities need to provide. It is the only complete end to end solution for online applications, a solution that facilitates decision making and case management of the applications received. What this means is that there is an intelligent flow of data from citizens, social workers, probation officers etc., directly into a consistent process within the back office. The solution comprises four key components that work in harmony with one another: the Online Application, an Intelligent Rules and Decision Engine, a Dynamic Case Management Application and Outcome/payment Management:
A great online application
Localised Social Fund (or the Scottish Welfare Fund if you are reading this in Scotland) will be the first applications to be delivered in a truly digital by default manner. Many of IEG4’s existing Housing and Council Tax Benefit eClaim customers already achieve uptake rates of 90% plus and some no longer even print paper forms.
This is because the user friendliness of IEG4’s online forms means that it is not only quicker to do it online, the citizen can do it at their convenience, 24/7, using their pc, laptop or smart phone. What’s more with integration to EDMS and back office processing systems our solutions have been enabling local authorities to be more efficient for many years.
So with the Localised Social Fund, we wanted to ensure that the same capabilities of the online form were present but with some added extras to make the process even slicker for citizens, trusted 3rd parties and council staff alike. So the online form can be accessible publicly to citizens as well as also being accessible securely to Council Staff and Trusted 3rd parties.
Moreover, because the online application form has unrivalled integration to the back office case management solution new and innovative business processes can be undertaken rather than having to work with the restrictions imposed by legacy software. This section of the document will outline the various features of the online form as well as outlining the never before seen levels of integration with the back office app.
Driving the user through the process
The DWP’s SF300 Community Care Grant & Crisis Loan application form is more than 40 pages long as a consequence of the fact that it needs to manage the many different circumstances that may lead a citizen to need to apply for help. With an online form, however, intelligence can be introduced to guide a citizen through the application process based upon their circumstances rather than make them view and respond to questions, which are irrelevant to their circumstances. This is done by having a user friendly ‘dashboard’ of options to enable them to select the circumstance that most closely relates to their position.
This is illustrated here:

With the most common scenarios relating to the equivalent of Community Care Grant and Crisis Loans in the top row.
NOTE:
As a part of your localisation, the text on each tile can also be edited to suit your local requirements – this text will be editable by you in the future but at the moment the tile text will be changed by IEG4
Plus, it is also possible for the images on the ‘tiles’ to be changed and we can even remove scenarios that you will not support as a part of your policy. When a ‘tile’ is selected the form intelligently changes to reflect this fact and so the Guidance Notes, questions and help that is offered all dynamically adjust to reflect the fact the circumstances of the citizen.
The following illustrates form’s guidance notes when the citizen has selected that they have had a disaster/emergency:

As one can see there are pages to collect details about Household, Income, Expenses, Savings and crucially details about their circumstances i.e. in this case their disaster and the help they need.
For each circumstance they are provided with questions contextually to their circumstances. As well as having a notes box for the user to record why they need the assistance so desperately and what will happen if they do not get assistance.
Plus, we also have an Equalities page to enable ethnicity, disability, and religious belief information to be collected.
Regular Outgoings
One of the most innovative of the features that is present within the solution is the ability to set up items within the back office, which are immediately reflected within the online form. With regular outgoings or expenses, what this means is that the user can control the list of items that a user can select within the online form directly from the back office application.
Even more powerful however is the application’s ability to carry out a means test upon the claim based upon these expenses vs their income in real time upon submission. So a user can set up the expenses with the back office as shown below:

They can then also set a maximum weekly allowable value to be used in the calculation of their disposable income. So the application looks at the household make up and based upon this will immediately determine the allowed expense to compare with their income.
For example John McMahon lives alone and spends £100.00 per week on food. You would not want to compare this value with his income support value of £71.00 per week because he is clearly spending way more than one should if one lives alone.
As one can see, in the screenshot above, the maximum weekly value for food is set to
£30.00 per week for Applicant only. If it was a claimant, a partner and 2 children the maximum would be £54.00 per week, as the application would total the Applicant, Partner and 2 x Children rates to get weekly allowable expense. What this ensures is that there is complete consistency in the means test/calculation of disposable income. To edit an item it is simply a case of clicking on that item.
Once any items are added to the above list they are immediately available in the online application form as shown below:

So, for the first time in a public sector solution, the front office is completely updated by the back office and the values used in the calculation of the disposable income are available to the front office from the back office at the point of submission.
Help Needed
The help that you offer can also be changed based upon the nature of the circumstances. So for example in the above ‘Disaster’ scenario, the application is coded to offer the following services in help:
- Rent Deposit – as their house may be flooded, been burned down
- Household Items – as they may need help buying a bed/furniture/white goods
- Clothing – as they may need clothing
- Food – as they may help with providing food for their family
Although the same page would only offer Rent Deposit & Household items if their circumstance was that they were leaving care and moving into the community. While the application defaults to the above we can change this for a customer.
The total list of help types is grouped into:
- Rent in Advance/Rent Deposit
- Household Items
- Clothing
- Food
- Travel
- Utilities
Help Item Sub-types
Like Expenses, within the back office a user can set up a household item in the parameters and the online application will immediately update based upon this list. Thereby:
- Ensuring the two are always in sync
- Ensuring administration time is reduced as a single updates both ends of the system
- Ensuring that new items can be added without needing to come back to IEG4 and therefore provide the service in a much more effective and agile
This is illustrated below, with the back office parameters on the right immediately visible within the online form:

Evidence
We recognised that not every Local Authority would have the same evidence requirements with some needing evidence for all applications and some having little evidence needed.
Therefore, like the household items above, we provide the means for a local authority to set up their evidence in the online form intelligently using the back office application. For each item it is possible to specify whether a) there is an evidence requirement and then b) what evidence is needed:

So it is possible to add an evidence policy for each of the different items. This is because you may want evidence for items which are relatively higher value items need to have evidence provided form them. As this is set up in the back office the online form intelligently adapts and adds in an evidence page where the user has requested an item which has an evidence requirement. This is illustrated in the screen shot below:

Upload Evidence in the Online Form
Now, not only can one show the user that evidence is required. They can also allow the user to upload documents/images etc. to prove this. This is through use of the new Upload control, as shown here:

Clicking on Upload files makes the following appear:

Within here one can then select to browse for an item from the pc to select an item to upload. In this version one can also do this using a smart phone as shown here and so a citizen could upload a picture of their flooded house etc.:

Now, to reflect the fact that the citizen may still need to provide evidence the status of their decision highlights this. As well as also indicating which items are still needed:

Uploading Evidence in the back office
We wanted to ensure that local authorities could lose their reliance on EDMS and thus facilitate slicker case driven work rather than have to understand multiple back office apps. So there is now a Verify option, which is where a user can upload evidence to a case within the case management application:

As one can see here, in this case evidence is still required for an application for assistance getting some Food. The application shows the evidence policy set up and also facilitates a user uploading evidence:

Clicking on the ‘Browse’ button enables you to then look on your pc or Council network to locate scanned images and attach them to the case:

Once, the user has uploaded the document and clicked the ‘All evidence provided and verified’ button, the case can then be decided. One can click this button where further documentation is not needed to facilitate deciding the case. Ultimately this workflow ensures that the application meets the evidence requirements prior to assessment but can be bypassed where needs be. The following shows the screen when the user has stated that the items have been verified:

Evidence that has been uploaded is instantly available against a case and one can see which user added the item:

Turning Evidence Upload on
This is done via 2 settings within the System Management console. These are accessed by first going into the Settings area and then choosing the General Welfare Assistance form from the drop down:

Once you have selected this scroll to the bottom two options. The first relates to turning on the feature in the back office and the second the online form. Click edit to change these from false to true:

Making Award and Grants your own
Unlike most online software applications, which are very much created to have rigid content and functionality within them, we wanted to provide a solution that was easily changed to reflect local policies and also one that was easy to customise as the first year progresses and the service delivery is more understood.
So our eForm ‘Editor’ capability removes any inflexibility and provides users with the ability to change huge amounts of the content within the online form. To start using the Editor the user first needs to be in the ‘Development’ mode of the application. By default we have given all customers the Development version of the form and so this will present as soon as you log in.
Once logged in the user will see the ‘Design Tools’ button at the top of the screen for each page thereafter. When clicked this opens a menu on the right and if ‘Start Editing’ is clicked the user then has the ability to change any of the wording in the form.

You can read more about editing form content here on ieg4u:
https://www.ieg4u.com/customer-area/how-to/editing-forms/
We also recognised that:
- Councils may not want to support all of the circumstances that are the default within the online launch page.
- Councils may want to change the help that a person can apply for for any given circumstance.
So within the case management application, there is now a new option ‘Applications’, which allows you to do both of the above. Here you can see the Disaster(Crisis scenario) and the fact that it is enabled and Food, Clothes and Household Items are the things a person can apply for:

It is simply a case of unchecking the box to remove a scenario from being used. Here one can see the great use of editing and this function Brighton and Hove Council have made to reflect their local scheme. Note that they have also changed the images being used for the tiles – how to do this is shown below:

Likewise, Blackpool have carried out some tweaks:

Changing or Removing Images used (Note this is a relatively technical process)
As highlighted above it is now possible to change the images that are used. To do this one needs to access the system management feature as shown below (the username and password used for accessing the online form is the same one here). Within System Management click on the Files option on the far right and select General Welfare Assistance from the drop down:

You will then see there is a file that can be edited. Essentially, this file shows all scenarios and the images linked to them. In order to swap images it is simply a case of taking the image name i.e. gwa_prevent_care.png and pasting it to the relevant tile. In fact in this case the image used on the second tile relating to preventing going into care has been used to replace the Returning from Care image:

To remove an image it is simply a case of deleting the image name from the file and pressing save. In order to make sure changes made by you are reflected in the online form
you need to clear the cache from your browser. This is done by logging on to the form and changing the URL on the home page from:
https://yourcounciletc/Gwa/launch To
https://yourcounciletc/Gwa/clearcache
Obviously replacing your council where highlighted. When you load this page there will be a button in the top left called Clear Cache; click it and then go back to the home screen and your changes will have been made.
The images that are used are simply referenced from the images area of the application and so it is possible to upload new images within the Images area that can then be referenced in the file above. I.e. you upload an image with a name like Crisis.png and then go to the file holding all of the images and place the uploaded file name in the relevant place i.e. against Disaster in that instance:

Editing Content
To illustrate the vast array of things that can be edited please see the Guidance Notes page of this online claim form when in ‘Edit Mode’.
Once logged in the user will see the ‘Design Tools’ button at the top of the screen for each page thereafter. When clicked this opens a menu on the right and if ‘Start Editing’ is clicked the user then has the ability to change any of the wording in the form.

ou can read more about editing form content here on ieg4u: https://www.ieg4u.com/customer-area/how-to/editing-forms/ It is possible to:
- Rename the form itself – for example say Local Welfare Provision
- Rename the Contents bar - for example to ‘Progress Bar’
- Rename the pages in the Contents bar to something else – for example Guidance notes could be updated to Helpful Information
- Reference Number – for example could be changed to ‘Write this ref. down’
- Change the entirety of the Guidance Notes to whatever you
- Insert text above and below the content of any one
To do this one simply needs to click on the zone that is desired to be changed.
Any Device
Providing a solution digitally means that the access channels to that service need to be optimal. This also means that trends in device usage to access the internet need to be understood and software enhanced in reflection of these trends. In 2014, the internet became viewed by more mobile devices than it was on desktop/laptop computers and so we wanted to ensure our customers were ahead of the curve from day one.
The IEG4 solution will recognise that a non desktop pc/laptop is being used and scale the interface accordingly to act like an ‘app’ rather than have the user zoom in and have a bad user experience. So the same claim can be seen at the exact same point on both the desktop and a smart phone below:

Case Management and Decision Making evolved
As highlighted above the key to an evolved solution to Localised Social Fund (or the Scottish Welfare Fund if you are reading this in Scotland) will be one that is delivered digitally. However, we wanted to evolve the process of decision making and case management as well to take it away from one which requires user input on every single decision to one which shifts focus to only those which require human intervention. This has been possible by the introduction of a next generation, browser based case management application as well as a rules and decision engine which can be populated with your rules and policies on when claims should and should not be eligible for payment.
Consequently, at the point of submission of the online application the application will check the rules to determine if the application should be accepted, referred or rejected. Meaning that for cases where the application is accepted or rejected, the only task the local authority has to undertake is issue the payment where it is a voucher/prepaid card. Where a contractor is set up to deliver a service that has been approved, the local authority needs to do absolutely nothing. Because the citizen is emailed the outcome of the application and the contractor is emailed to deliver/provide the service they are contracted to automatically.
Case List
The case list essentially provides users with the ability to see all cases that are outstanding, see whether someone is already working on a case and also search for a case in general. The case list essentially acts as a work tray where users can see the work that needs to be done and work see which work is already being completed by someone else. Therefore in many ways this is also a task management screen.
This is illustrated below:

So one can see when cases were received, the circumstance, the person claiming, the online form reference and also whether the case is currently been worked upon. All of these are currently outstanding cases and those highlighted with a green tick are being worked upon. Those without a green tick can be picked up by staff to work upon. It is possible to search for cases based upon:
- Reference Number
- NINO
- Last Name
- Date of Birth
It is also possible to filter the cases and this is possible to be done by:
Work Area/Ward

Case Status

The Case Status filters are as follows:
- All – Shows all Case Statuses
- Awaiting Decision - means all evidence has been received (if a policy is in place) and is awaiting an assessor making a decision
- Awaiting Evidence – means that evidence is required for at least one item they have applied for and has not yet been uploaded
- Awaiting Evidence Verification – means that evidence has been uploaded against a case but that it has not yet been checked by an
- A Payment Decision outstanding
- This means the case has been decided but is not a Contractor and so an assessor needs to specify how the payment is to be issued i.e. vouchers
- Payment(s) awaiting collection
- An Appeal outstanding
- Completed – shows cases where nothing is outstanding to assess / verify on a case
Date Received
This is simply to enable you to show the most recent cases quickly and easily:

As a part of your implementation it is possible for us to load every ward of the council into the application directly, therefore ensuring that it is also possible to report upon this. To access any case it is simply a case of clicking on the line in question. One can also see on this screen the user that is currently logged in. This is taken from the first name of the user within the Users set up – please see the Users section later in this document for details. The ‘logged in’ user’s name is highlighted here:

Case Details
This is the screen that is presented when a case is opened from the Case List screen and is illustrated below:

This screen is broken down into 6 key areas that mean that a user does not need to learn anything outside of the this screen in terms of viewing case details, documents, payments, notes, decisions. As well as being able to carry out actions i.e. deciding the case, paying the case, notifying the claimant and adding notes.
The 6 key areas are:
- The Claimant’s Details
- Warnings
- The Claim Summary
- The Application & Decision Summary
- The Documents, Decisions, Payments and Notes bar
- The Actions pane
The Claimant’s details are the high level details about the name, date of birth, reference number and address etc. that relate to the claim.
Warnings appear when linked cases are present and this will be shown later.
The Claim Summary is the key to being able to view lots of information within a small area of space. The Summary outlines whether a partner, child(ren), non dependant(s), flags (or statuses such as disabled/student) are present on the claim. As well as outlining the circumstance of the application and the breakdown of the income and expenses.
To view the details within an item the downward facing arrow on each item can be clicked and this detail is shown. The following shows the expenses that the citizen entered within the online form:

As well as showing that the income is £148.45, the case type is a disaster and that there is no partner, child(ren) or non dependants on the claim. So as a user they can quickly and easily see the main details of the application.
Where this summary really comes into its own is where there are multiple cases that are linked and a warning is present. When this is true one can see in the case below that a user can compare the cases received side by side:

So in the case above, one can see that the expenses are different from the first case. This means that if a person made an online application on Monday and was automatically rejected and then on Tuesday they made another online application that would have been successful due to the changes a person made to their responses. The application will detect this and link the two together before referring (rather than approving) the case so that a user can review it. This way a user can quickly an easily compare the two (or more) applications to see the difference in their responses and therefore change the outcome of the decision where there appears to be a suggestion of fraud/inaccurate information being provided.
This same functionality is also used where our DHP, Section 17, LCTS Hardship applications are also used by local authorities. Meaning that for the first time a council can see holistically the monies that a citizen is applying for and receiving across the council.
The Application and Decision Summary allows you to see what a person applied for, what the justification was for their application, the status of their application (note the possible statuses are those which can be filtered upon in the Case List), any rules that have been invoked where the case is referred, auto-rejected/accepted and also see whether there is an appeal present upon the case.
The following shows the citizen’s justification for needing the item. This in conjunction with their expenses/income will aid your decisions:

The following shows the rules that were invoked on this case where help with Food was requested:

The Documents, Decisions, Payments and Notes bar has been designed to provide access to a huge array of information very easily.
Documents holds the documents/media that have been received/uploaded. Every case will at least have the original application form as shown here:

Decisions allows a user to understand the history of any decisions that have been made on a case. The lines that are shown in green indicate the current decisions on those items:

Payments allows a user to see the current situation with Regards to payments made. It also allows a user to understand whether an invoice has been received for a payment yet and thus is reconciled or not:

Details of what happens when a decision is reversed can be found later within the Cancel section.
Notes is quite simply a trail of all notes added to a case.

NB - In early 2019 this was updated to have a line separator between notes.
Verify
The Verify function carries out two functions when Evidence is set as being required for items.
- To allow an assessor to indicate whether all evidence has been seen
- To allow an assessor to upload evidence that has been provided by a citizen
We wanted to ensure that local authorities could lose their reliance on EDMS and thus facilitate slicker case driven work rather than have to understand multiple back office apps. So there is now a Verify option, which is where a user can upload evidence to a case within the case management application:

As one can see here, in this case evidence is still required for an application for assistance getting some Food. The application shows the evidence policy set up and also facilitates a user uploading evidence:

Clicking on the ‘Browse’ button enables you to then look on your pc or Council network to locate scanned images and attach them to the case:

Once, the user has uploaded the document and clicked the ‘All evidence provided and verified’ button, the case can then be decided. One can click this button where further documentation is not needed to facilitate deciding the case. Ultimately this workflow ensures that the application meets the evidence requirements prior to assessment but can be bypassed where needs be. The following shows the screen when the user has stated that the items have been verified:

Evidence that has been uploaded is instantly available against a case and one can see which user added the item:

Decide
The Decide function is where a user decided whether to Accept or Reject a case. When a case is accepted, the user needs to select a reason complementary to why they are going to approve the case.
Normally the payment type will only have one option but if the system has been set up to support more than one then the drop down for Payment Type to award will allow multiple options. Plus, it will also depend how the system is set up by administrators whether the assessor needs to select an amount to award. The following shows a case being accepted:

All decision processes are the same with the exception of where a service is to be provided by a Contractor. If a service is to be provided by a Contractor an assessor can add notes that will be present in the email sent to the Contractor in question. This is shown here:

Where a case is rejected the user only needs to select a reason:

Correspond
The application provides highly intelligent letter/email/SMS* generation, which can be:
- a) Based upon the outcome of a decision or
- b) An entirely Ad-hoc email/letter.
The following provides an illustration of the functionality where a decision has been made and all options are being used, i.e. an email, a letter and SMS is to be issued:

The letter content is immediately created based upon many things but here are a few key elements:
- The application type
- The things applied for
- The ward in which they live, as you may specify different locations to collect payment/ hand in evidence depending upon where they live
- The outcome of their application
Another important element is the fact that any letter that is automatically generated can be edited by the user using the rich text editing controls shown in the screenshot.
As one can see it is possible to send attachments, change the email subject, add as many email receipients as required, select the correct address to send it to and add SMS recipient(s).
Note: The ability to send correspondence by SMS is an optional feature.
The powerful thing is that as soon as documents are sent they are instantly accessible from the Case Details screen and these are shown here for this case:

To give an indication of the decision letter template which can handle accepted, referred and rejected applications please see the output from a decision made in the system. This is more to illustrate the level of automation present when the letter is generated that to illustrate the scenarios you will support. Items in blue are template fields, items in green are paragraphs.
EXAMPLE DECISION TEMPLATE – KNOWN AS CASE STATUS
Dear Phil Cartmell
Your Reference Number is: ZCHFDFDB
Local Welfare Assistance that you made on 16/01/2013.
We have decided that based upon your circumstances you are entitled to at least one of the
items/services that you requested.
Food Assistance
You applied for £30.00 to help you at this time.
We have decided that you qualify for this and we will be awarding you £20.00 to assist you with
purchasing food
This will be paid by ASDA Prepaid Card
You can collect the payment/item at Sheffield First Point, Street, Sheffield
Clothing
You applied for £50.00 to help you at this time
We have decided that you do not qualify for this.
Travel Assistance
You applied for £30.00 to help you at this time.
We have decided that you qualify for this and we will be awarding you £30.00 to assist you with
your travel costs.
This will be paid by Travel Voucher
You can collect the payment/item at Sheffield Train Station.
You will need to provide the following before or when collecting your item:
Your Local Welfare Assistance Claim Reference and some identification
Your Local Welfare Assistance Claim Reference and some identification
Utilities
You applied for £145.00 to help you at this time
We have decided that you qualify for this and we will be awarding you:
£100.00 towards your electricity/gas arrears
£45.00 towards your electricity/gas reconnection
To assist you with having your electricity/gas available to you
This will be paid by Cash to your supplier
Should you disagree with any of the decision(s) we have made then please send an email to us
outlining why you feel that our decision should be changed
Kind Regards,
Mr Andrew Cope
Local Welfare Assistance Manager
The decision template is able therefore to manage decisions made and therefore the main tool for issuing notifications. The actual templates are editable; however, this will be done as a part of the implementation by IEG4. That is to say we would ask how you would like the template(s) to be adjusted and then we implement this for you ahead of go live and changes that are required are done by us when requested. It is expected that in a subsequent release that like the online form, these will also be editable by users.
But that said the actual content of each notification can be changed using the rich text editing features on an ad hoc basis as it is issued, should something specific to the claim be needed.
Text Messaging (SMS)
There are use cases for which text messaging can provide a highly effective quick and simple communication mechanism to customers. As well as being cheaper than the traditional printing of paper and postage. Where SMS is enabled (please speak to John Jervis john.jervis@ieg4.com if you are interested in this), it is possible to send text messages directly to the citizen (or their support worker) to provide details of payments/ details of a decision etc.
Blackpool Council are using this function in a highly effective way, which is to let a citizen know the Post Office reference number to use when collecting a payment for electricity top ups. Therefore I have shown this functionality being used for this. Firstly, as the content of a text cannot exceed 160 characters, the Empty template is the best one to use. Just like Letter the user needs to select the linked phone number and add it to the SMS recipient box. Therefore this could be more than one number if this is required. The normal editing features are present and the text can also be previewed before being sent.

When the text is sent it is immediately added to the Documents area as shown here:

Therefore ensuring that an audit of the fact that the text has been issued is always present and details of this can be viewed by subsequent users etc.
Here we can see this arriving to the telephone number in question:

Pay
Paying a case is there for non-contractor services to be able to record details of voucher/ prepaid card/barcode information at the point at which they are provided to the customer. It is not needed for Contractors as they are set up to be paid a prearranged amount and so there is no need for assessor involvement. When vouchers etc. are collected by the citizen and this screen is updated, the budget for these items is immediately reduced in line with this fact. The following shows this screen when a prepaid card is issued:

The following shows the screen when vouchers are issued – note that the Add Payment link is used to make it possible to log details of multiple vouchers:

Cancel
This functionality has been created entirely to correct user error when assessing cases. To illustrate this functionality we will show a worked example. The following case has 5 components that have been applied for with 4 items accepted and 4 items rejected:

When we expand the Decisions Summary (prior to payment) we can see that the original referrals are now shaded white and a new End Date column is populated with the date the decision was changed:

After paying the case it looks as follows:

Note that there are 5 payments but only 3 are set to reconciled at the present time, as the first two relate to a contractor where an invoice is outstanding. The reason we are showing it is in this order is to show the new reconciled value against a case, which is shown in brackets against the total i.e. £167.00 is the committed amount and the (£35.00) is the actual spend recorded.
And the Budget for June looks like this prior to reconciling the two supplier payments:

I.e. there is currently £182.00 set against Household Items.
We then reconcile two invoices back against the two items for the case i.e. Cooking Facilities and Fridge. One being lower £80.00 and one higher £50.00 than the original amount committed:

I.e. the first is £7.00 lower and the second £5.00 higher; thus, a £2.00 net reduction in the amount of money spent on the case and therefore £2.00 extra available to spend.
As you can see in the Budget this has now been changed to reflect this:

If we go back to the case we can see that the case in question has been updated, with the Payments area now showing the reconciled values and in the high level summary the amount in brackets now reflects the reconciliation that has just taken place i.e. £167.00 was the original committed but the actual is £165.00:

Now one understands that the green lines are the current decision and current payment we can make a change to illustrate how this is reflected back.
Note that once this role has been set to true the user needs to log out and back in for the functionality to then be made available. Once in place we can now change a decision. We are going to change the item, which was rejected i.e. Bedding to now be accepted.
To do this, the user needs to first click on the decide option in the tool bar. Once this is clicked one can see a new ‘Cancel’ option, which is there to reverse/change an original decision:

Once we click on Bedding, and tick the check box we need to add a reason for the change:

Once this is saved, one can see that the status of the decision has been reset to Referred with the reason that we added showing on screen too:

The new colour coding becomes important here, as it shows the current decision for Bedding in green and those, which are now defunct in white (along with and End Date for the decision):
So now we can reassess this item to being accepted:

On Save, we can see the committed Payment amount has increased and Bedding is present and the reconciled amount stays the same until the invoice is received and updated in Payment History:

Obviously an email is then sent to the Contractor to let them know to provide this:

Another Example
Some sites have reported that users are also making errors in how items should have been selected to be paid. Now in reality it is best to always have just one payment method linked to a given item to prevent this but then this is not always possible and so users can make mistakes.
This time we are going to change how someone is being paid. Bedding has been decided as being provided to a supplier but the Council wants to change both the amount and the method to be a payment from a Council Card. We can see below that the current (green) decision for Bedding is a contractor for £45.00 and we can see the total committed on the claim is £212.00 (with £165.00 actual):

We are going to reverse the decision to be paid by Council Card. Note that this time because you might want to change:
- The whole decision
- Who has been paid
- The payment decision amount
There is a nested tree structure to show this. NOTE THAT FOR CONTRACTORS YOU ALWAYS REVERSE THE HIGH LEVEL ELIGIBILITY DECISION. THE LOWER LEVEL ELEMENTS ARE FOR VOUCHERS etc.

After the decision is reversed, we can see the Payment amount has reduced to £167.00 (£165.00) and the Current Decision is Referred – User Error:

Now we can change this to be a different method and amount:

Three things have happened this time:
- The Payments amounts are adjusted to reflect the change in amount and method
- An email is sent to the supplier to cancel the last order
- The budget is updated in line with the change
The following show the Email Cancellation for the supplier, which is automatically generated:

Changing a Payment Decision
We have provided a new ‘Adjust payment amount’ feature which is shown below:

This enables a user with the new Case Worker – Override Decision permission (see here) to change the details of a payment:

Once a payment has been changed a row is instantly inserted into the notes to show what the payment has been changed from and to, as well as updating the budget for the component in question to reflect the new value:

Add Note
The simplest of functions this is simply a tool to add notes that are relevant to a case:

Once added these show in the Notes area mentioned earlier:

Upload
We have had many requests from customers to be able to upload documents at any time to a case to ensure that there is no need for a separate document store. This function works just like the Verify functionality. To reflect our continued goal of providing you with the best solution for administering your scheme, we have now provided this feature. As shown here:

One file can be uploaded at a time and on this case we can see that we have uploaded a PDF, a Word Document, an Image and an Email Message all after the case was decided:

Settings
Mapping your Policy
The great thing about the solution is that it has been designed to complement the way you want to work rather than restricting it. The use of parameters within the application is to ensure that your eligibility criteria, your chosen methods of payment, and evidence arrangements comply with your policy.
Below we show how:
- Rules are changed and therefore how eligibility can be changed to match your scheme
- Payment methods are set up
- The types of goods services are to be delivered and the ability to link these to payment methods
- To control the maximum value associated with payments issued
- To link an evidence policy with the item/good/service being applied for
- To set up Decision reasons specific to each item/good/service being decided upon
- To set up service points where evidence can be handed in and payments issued
- Based upon geographical location
Rules & Eligibility Checking
Key to the Social Fund Online solution is the ability to automatically:
- Reject
- Refer
- Approve Cases
But critically based upon criteria that you specify. This concept was first conceived and realised by IEG4 for Social Fund Online and as such this rules engine is now highly capable and beautifully integrated with the front end application process. The Rules can be set up distinctly based upon the goods/services/items that they are applying for and also by the channel from which the application has been received.
It is possible therefore to disqualify a person receiving one item they have applied for but continue with an application for another. I.e. if you make it easier to qualify for Food than Clothing, then the application will allow the user to go through the application process for the Food element where they only qualify for help with that.
The following illustrates this:

Whereby one can see here that the rule set being viewed is for Food and is where the citizen has completed the application.
Note that it may be that you use the same rules for all components and all channels from go live, but as you understand in more detail the granularity of demographics of the applications received, you have all of the functionality there to enable you to be agile to change.
The List of Rules section of the screenshot above shows the current rules in place for a given component and also whether:
It is enabled
It will cause an automatic rejection i.e. Lack of a Passported Benefit will cause this above It will cause an automatic referral
It will not carry out an action but will use the score associated with that variable and any others relevant to provide a weighting of vulnerability/priority
This latter feature therefore ensures that you can discern between those that really need help and those that simply have poor money management and are trying to get a bill paid.
There are also filters where the check boxes are, which enable you to reduce the size of the list of rules for easier viewing. I.e. if only the ‘Include Instant Fails’ check box is checked then only rules where there is an automatically rejection will be shown.
Referring to the weighting of scores the Pass Mark and Fail Mark controls (in the screenshot previously) are the levels at which the weighting will dictate if the claim should be accepted, referred, rejected.
So a simplified version of the logic is:
IF No automatic referral/rejections have taken place for the claim SUM all of the scores applicable and then check
IF less than Fail Mark = Automatic Reject
IF greater than the Fail Mark but less then the Pass Mark = Automatic Refer
IF greater than the Pass Mark = Automatically approve
When the rules are checked
This check will normally take place at the point of submission of the online form, however, it is also possible to have the rules checked at the About Your Claim stage i.e. only 3 pages in. This enables you to ensure that people that do not meet the basic qualifying criteria are cut out of the loop early.
But, critically, as they have had to go past the 2nd page, which is the Tell Us Who You Are page, the Case Management application is provided with enough information to be able to be populated and hold the completed (rejected) case.
Thus, should the citizen attempt to make another application online 5 minutes later but this time change their responses, the application is able to intelligently link them and prevent the fraudulent 2nd application being automatically approved.
Some example rules
Within the application you have access to have rules upon the following:
- Rules based upon being:
- Rule based upon length of time resident in local authority
- Being a full time student
- Being resident as a consequence of being in a religious order
- Being Severely Mentally Impaired
- Being Blind
- Being Employed
- Receiving IS
- Receiving JSA (IB)
- Receiving ESA (IR)
- Receiving PCGC
- Receiving Carer’s Allowance
- Receiving Attendance Allowance
- Receiving ESA (C)
- Receiving JSA (C)
- Receiving DLA Care
- With the ability to set a weighting for each rate low, med, high
- Receiving DLA Mobility
- With the ability to set a weighting for each rate low, med, high
- Receiving PIP Daily Living Expenses
- With the ability to set a weighting for each rate standard/enhanced
- Receiving PIP Mobility
- With the ability to set a weighting for each rate standard/enhanced
- Receiving Housing Benefit?
- Receiving Local Council Tax Support
- Previous application received and approved with the past x months
- With the ability to configure a number of months
Previous application received and rejected with the past x days
- With the ability to configure a number of days
- Rule for where the level of savings = greater than cost of item(s) requested
- Rule for where the level of overdraft/credit = greater than cost of item (s) requested
- Rule for where the level of help from friends = greater than cost of item (s) requested
- Rule for where Additional Property owned = Yes
- Rules/scorings for Age bands controllable by users
- Rules by disability status see part in Online form re
- Rule by number of children in household over 5
- Rule by number of children under 5
- Rule by number of children under 1
- Rules for low, medium and high disposable income shortfall/surplus
- Rule for Non dependants in receipt of passported benefit present
- With an extra feature that the weighting can be multiplied by number of non-dependants
- Rule for Non dependant that is employed
- Rule to enable weighting on Disaster Type
- Rule for where: Do you have insurance against this? = Yes
Payment Types
This part of the system provides the ability to say how you will be able to meet the assistance needs that customers can apply for. So where a person applies for assistance with:
- A Rent Deposit (For Community Care Grant style applications)
- Food
- Clothing
- Household Goods
- Utility payments
You need to tell the application how these will be paid or be serviced. That is to say rather than being paid a contractor may provide the service and you would then be invoiced by them following agreements that you have in place.
The first thing to do for payment is to set up how you will make payments i.e. prepaid cards, vouchers, cash, or contractors.
So if you are going to pay by prepaid card this is as simple as adding the type of companies you will be providing the cards for. Here you can see Argos and other Prepaid Cards in the application. Adding a new one is as simple a clicking on the plus icon highlighted in light grey and recording the details.

This is the same process for Vouchers, though because they are recorded separately it is possible to report upon them separately. It is expected with Cash there will only be 2 options and some council may use neither to ensure cash is not used a payment method. But it is possible to pay by physical cash and BACS payments.
Contractors
Contractors are slightly different to the above because the application is intelligent in how it deals with these. Essentially when adding a contractor all of the following can be entered:
- VAT Registration Number
- Contractor name
- Sales Email address*
- Accounts Payable Phone number
- Accounts Payable Email Address
- Accounts Payable Fax number
- Customer Services Phone number
- Customer Services Email Address
- Fulfilment template, which can hold their Address (if it is a place where goods can be collected e.g. Foodbank)
*This is the email address, which will be automatically emailed when a decision is approved to provide a service using said contractor.
So if you set up a contractor like Furnishing Tenancies, you would enter the above. Then when a claim was decided and the contractor was selected to provide a service, using the email address, it would automatically issue a notification to them too. Ensuring that they knew to deliver furniture/white goods. The following illustrates the contractor screen:

One of the functions that we realised we would need to provide is the ability to set up Contractor specific fulfilment templates. So taking that principle, we created the means to
not only create your own contractor specific templates, but also provided the means to test the template within the same area to see how it will appear when issued as an email:

The following illustrates a template created specifically for a contractor that is providing household goods. The table present will automatically be populated and if there is more than one item it will create the number of rows needed with the details populated. This template is something that LB of Lambeth Council need to provide their contractor and as such some fields are for the contractor to complete, hence they are blank in the letter:
Name: John McMahon
Address: 1 Road, Townsville, A City, Someshire, BB9 9BB
Claim Reference: DHFUSDHF
Items Required
|
Description |
Our Payment Reference |
Quantity |
Secondhand |
Reconditioned |
Purchased |
Maximum Estimated Amount |
Actual Amount |
|
Sofa - 2 Seater |
04430233 |
|
|
|
|
120.00 |
|
How did the client make contact
Phone
Attended Shop
Date of Client Contact:
These are some notes
Regards,
Emergency Support Fund Manager
Linking Payment Types to Goods applied for
Once the payment types are in place, these can then be linked to the items that a citizen can apply for and therefore the items that you will pay for. So here we can see that for Food the payment type of Paypoint voucher, which was set up in Payment Types, has been linked to payment of food:

You will also note that there are some parameters linked to the Paypoint Voucher for Food and these relate to the maximum amount that you will allow to be paid in Paypoint Vouchers specifically for this item type, based upon the size of the household.
This is set up by clicking on the above highlighted line:

As you can see it is possible to set:
- That the payment method for Paypoint Vouchers is applicable to food
- That the vouchers can be issued in multiples e. if £25.00 is awarded you might issue a
£20.00 and £5.00 voucher.
A maximum amount for:
- The Claimant
- A Partner if they are also on the claim
- Each child on the claim
- Each non-dependant on the claim
So in the above example, there is a maximum amount of £50.00 for Paypoint vouchers, where only a claimant is on the claim and the application is for Food. If there was a couple with two children the system would automatically know the maximum would be £85.00. As it adds up the Claimant amount £50.00 to the Partner amount £15.00 and 2 x the child amount £10.00, which equates to £85.00.What this means is that you can ensure that the maximum award for food is consistent in all assessments.
This also means if all food will be paid using this method this only needs to be set up once and is the only thing needed to deal with this in the parameters. As you can see below, there are two components Gas and Electricity and these then have subcomponents of Arrears and PrePayMeter to allow you to manage both of the different customer situations:

Household Items, Evidence & Decisions
The above scenarios show how simple it is to link a payment type to a service (food) that is to be provided. Here we will show how Household Items can be added and how these and any item type can have an evidence policy set up for them. I.e. Evidence Requirements can be set up for Food, Clothing, Rent, Household Goods, Utilities, but most apt for these as the value of the goods is likely to be higher. In the screenshot below we can see that with household goods it is possible to add items that you as a Council can provide in partnership with your contractor/other council department like Furnishing Tenancies.
Here you can see we have a list of items and that Furnishing Tenancies is the contractor set up to provide that good. You will also note that in the maximum amount columns there is only a value in the claimant column. This is because this price does not change based upon the size of the household and is a fixed cost:

So, adding new household items is easily done, using the plus symbol on the grey bar and then the payment method can be linked as it is for Fridge.So, as soon as an item is entered in here the online form is updated to also have it too, thereby reducing administrative set up and ongoing maintenance.
If we look at the detail on this line we see:

The contractor – Furnishing Tenancies – is linked to providing fridges, there is a fixed and agreed cost for this item with this contractor and the amount is £55
Adding your Evidence Policy
Associating evidence to an item is as simple as clicking on the Evidence Requirements sections to reveal this:

So as soon as the item has an evidence policy aligned with it, if the citizen applies for it the online form will introduce and evidence page to let them know.
Decision Reasons
We wanted to ensure that you could make the decisions as granular as possible and contextual to the type of item/service being applied for. Below, one can see how a decision reason is added. So in this case this it will be reason specific to applications for food where an award has been approved. We know this because the Rejected reason check box is unchecked and so it is simple to add decisions reasons for rejected applications too.

Likewise there is also the ability to set up Appeal Reasons too:

Service Points
We recognised that not all councils will service their customers from one central location. As such within the application, one can create service points, or locations/buildings where evidence can be dropped off or payments collected. To create a new service point, this can easily be done as shown here:

Linking Service Points to Council Areas
The application enables a council to link evidence drop off points and payment collection points to different areas of the Council. So let’s say there was a town centre service location and a local office in the west of the council but nowhere else. In the wards in the west of the council you might link the local office to be the place where all of these can happen. But remaining areas need to come to the town centre if there are no local offices:

The great thing is that if you do use this functionality, the application will automatically ensure that on the notifications issued the citizen is told where they can hand in their evidence/collect payment based upon where they live automatically. To link a service point to a ward it is just a case of selecting it from the drop down.
Users & Security
Like most modern back office applications, there is the facility to both create users and administer their permissions.

Above we can see that the first and last name of the user as well as their email, which is their username for the application. We can also link a user to Council Areas within here, which means these will be the wards the user will see work for. Note that Administrator permission will enable that user automatically be able to see ALL work.

We can also see that they are not currently locked out of the application. Permissions are linked to Roles and it is possible to restrict every access to every function on the left hand navigation bar. It is also possible to link a user to a certain set of Council Wards (work area) to enable simpler allocation of work – in the same vein as work areas that Councils are used to BUT with real geographical resonance and in the context of how the Council is distributed.
So, in terms of roles and permissions, you for example make it such that front office counter staff, you only enable them to view the main case list and view case details rather than be able to action anything.
Below we can see the Case List when the user has had their permissions restricted and so the options on the left are massively reduced:

Likewise with actions within a case, for the front office worker, you would likely want to make it such that they could record payment i.e. issuing of vouchers, and a note but you would not necessarily want them to have access to decide the case or issue a letter:

Permissions are linked to each of the functions and so it is simply a case of selecting the functions that a person should have access to.
What the permissions do
ADMINISTRATOR
Access to all settings and option on the left hand side. Note Caseworker Full is needed if an admin can also decide cases
CASEWORKER FULL
Means that the user can decide cases and can access cases for all council wards
CASEWORKER OVERRIDE DECISION
This means that the user can override erroneous decisions made by staff.
CASEWORKER RESTRICTED
Like case worker full but means that only those wards linked to the user sees in the case list
PAYMENT DISTRIBUTOR
This should be added to those users who are going to actually record the voucher references, prepaid card numbers etc.
APPEALS
As the name suggests will allow one to log appeals
PAYMENT RECONCILE
Provides access to Payment History
COUNCIL ASSISTANCE
Enables you set up users who will only complete face to face or telephone applications and not use the back office. This means that they will need to login to the online form even when they access the live form - see trusted access section of guide.
THIRD PARTY ASSISTANCE
As above but for 3rd parties like CAB etc.
User Audit
As well as the ability to add users within the users screen it is possible to see an audit of the actions that a user has taken within the application. This is done by clicking the Sessions (View) column:

One can then see the IP address, platform, browser and when they started/ended their session:

Clicking on an item reveals further details of the actual things that the user did:

Trusted Access
We wanted to ensure that Councils could easily facilitate trusted and crucially audited access to the system by stakeholders/partners that you are working with to deliver the service. Not only can you provide this access but rules can be changed and adopted to reflect that the application has been completed by these bodies but also your own staff. Set up of these is shown below but to illustrate the principle, the following is an application made entirely by a citizen:

One can see that the channel is Citizen. Where an application is completed by a Council Member of staff, this changes to reflect this but crucially one can also see the user that assisted in the completion of the form:

To do this one needs to change the permissions that user has access to. Here we are going to Edit the user ieg4admin:

The permissions ‘AG_CouncilAssist’ and ‘AG_ThirdPartyAssist’ are what will determine the channel that will be recorded in the back office upon submission i.e. only one of these should be set:

Therefore should you wish the person to be a Third Party i.e. CAB, Foodbank etc. then the permission AG_ThirdPartyAssist should be used.
In order to facilitate the actual secure trusted instance, we need to create a Form Alias. This can be found in the Forms section of System Management as shown here:

When you click on this you can Create a new form alias (or trusted instance of the form). To create one you need provide a Name, Friendly Name, Description and whether it requires a logon or not. You will likely set this to Yes for all trusted/council access to facilitate a logon which enables the user details to be passed to the back office. Here we can see a Form Alias that has been created for the Credit Union:

So one can see that it is possible to click on the Details option to access the URL for the Alias. This URL is the one that should be provided to either Council staff or the Trusted party in question. I.e. It is possible to set up as many Aliases up as you’d like:

You’ll notice that in the Alias you can see the word Credit Union exists in the URL to reflect that it is an alias of the main form. You can also see that the Alias is restricted and therefore a logon is required. This will be how you would want to set all trusted access i.e. with it set to Y:

Financials
Currently, there is the means to set a budget at each component level and this is further broken down to a monthly value. Therefore providing a relatively granular level of fund management. The system automatically reduces the budget based upon payments made not decisions.
Budgets
Budgets for each fund managed – this is a test version and so we have set up a budget from January to April 2013:

With the details here once clicked upon:

As one can see it is possible to see the budget expected, the actual spent versus this and also the variance in the Budget vs Actual for each. Creating a budget item is very simple and can be seen here:

Budget (General Ledger) Codes
There is also the ability to link general ledger codes to components and this is done via the Budget Codes button: The beauty of this is that when the Payment History function is used to export details of payments, the general ledger code is automatically present within the exported details for your accounting/financial application:

Within the Budget Codes area, you will find that it is possible to set a different ledger code for each component:

Payment History
The Payment History section has been created to facilitate simple searching of payments/ invoices linked to payments and crucially to enable updates to be made to actual amounts invoiced. This is shown here:

One can also see that it is possible to filter by date range, reference number, method, component and whether a payment has been reconciled or not. In the scenario below, we can see that we have filtered for a specific contractor and we can also see that two payments have been reconciled back using an invoice received from the supplier:

So we can see that we can
Search for the payment reference, Filter by payment method
Filter by component
Filter to only show those where reconciliation has taken place
Create a CSV of the search results for export into other financial systems.
In order to be able to access the Financial area, a permission is needed. The following shows an example of the file output from the system:

Reconciling Payments – Auto-Budget Update
To ensure that the budget is updated based upon reconciled amounts the following parameter requires to be updated to be set to true:

So when this is clicked on it should be changed to appear as follows:

System
This area is where various settings can be changed to reflect various system features.

Some of these you may want to change and some are best left as they are. The following are those, which you may want to edit:
Outgoing mail server – Default from email address
This option enables you to set the ‘no-reply’ email address that customers will see when they are sent a decision notification via email.
User Security – Maximum Password Age
This is defaulted to 60 days and means that users must change their password at least every 60 days (or 2 months). This could easily be changed to 30 for example if you want the password to be changed each month.
User Security – Maximum authentication failures before challenge
This is defaulted to 5 and is the number of attempts a user can enter their password incorrectly before being locked out.

User Security – Stage 1 timeout
This is the number of seconds that the system can be idle before the application will warn the user that they will be logged out.
As one can see from the screenshot here the user is offered the opportunity to state they are still working before they are logged out:
This setting can therefore be adjusted to meet your own security standards.
User Security – Stage 2 timeout
This is the number of seconds that the system can be idle with the Inactivity Warning present before the application will automatically log the user out.
Reporting Dashboard - Charts
With our reporting suite, we wanted to ensure that the key management information that most local authorities would like to get out of the application would be available in the first release of the reports. Plus, we wanted to ensure local authorities were presented data in a clear and modern manner with no batch reports from circa 1985 with hours of running time.
This provides reports for:
- Payment Analysis
- Award Analysis
- Decision Analysis
- Decision Performance
Details of what each does can be found in the context of each but essentially one can visualise details of all payments made, all decision outcomes, and staff performance. These can be filtered to show specifics with all charts dynamically adjusting in real time to reflect the filters set.
To access the Reporting functionality, a user must have the Dashboard permission:

Once this has been set to a user, they should log out and back in to see the new option, which is also shown in this screen shot here i.e. the Charts option. When clicked the Reporting function will pop up in a separate window.
Payment Analysis
For the first report, which is self explanatory in that it allows one to visualise details of all payments made, we are going to show how the specific report works but at the same time also show how the generic reporting functionality works.
By default the Reporting area starts off blank with the current month present:

Therefore you should select the report you are interested in with Payment Analysis selected here:

As soon as you click on the report it will run it based upon the dates present in the ‘Query from’ and ‘Query to’ dates. There are two main views Daily and Monthly and the report with the default being Daily, which shows the current both (or that which has been set i.e. April in the example above). It is possible to view multiple months’ details by changing the Query Dates to span more than a month and click the ‘Monthly’ option on the far right hand side:

hanging the Query dates used
Whenever a user changes the date range to be used on the left hand side, the report will recognise this and ask if the user wants to reload the graph to take account of this. Clicking Reload Graph will then use the latest dates present:

As you can see from the charts above all of the different payment components are present in the chart and so I can see the make of payments by Household Goods, Travel, Clothing, Food etc. But there is a simple way to change the report to only show one specific area. This is done using the chart legend directly below the chart. I.e. in the example below one has unchecked all items except from Food. Because the charts no longer have to take account of the much higher Household Goods costs it scales the chart to be in proportion with this component only.

We wanted the charts to be both informative AND user friendly. This is why we opted for the stacked column chart.

By using this chart type a user can see not only how much is being spent overall but also how much is being spent as a proportion of the payments on a given day/month. Effectively providing you with a pie chart within the column.
Filter by Users
One will need to be able to see by User how much is being paid/awarded/decided and of course how user performance is doing. To filter by Users one simply clicks on the blue Users button below the Query To date field. When this is clicked a pop up is displayed for a user or users to be selected.
By default the reports include all users but, as one can see, it is possible to include certain users or exclude users from the report. You will notice that there is a Save and a Save & Reload button.
We would expect that the latter would be used where you only want to filter by Users as then the report will refresh instantly. However, if you want to filter further i.e. by User and by Geographical Area then pressing save until you have also filtered by the Council Wards you want to is best.
Filter by Geographic Area (Council Ward)
One of the benefits of having a system, which links all cases to wards, is that it enables users to filter all reports for a given ward. This is obviously great for providing management information to specific Councillors in an accurate and professional manner:

Filter by Circumstance (Application Scenarios)
Within the application it is possible to set up the tiles that you want citizens to apply for help under. Consequently, the Circumstances filter allows you to filter by specific types:

Filter by Payment Types
In order to visualise Payments by the different methods that you have i.e. to filter by a specific contractor for example:

Filter by Component Details
This filter enables a highly granular breakdown of each item type of item that has been paid out upon:

Filter by Channel
Some local authorities have set up Form aliases using our unique Trusted Access facilities. Therefore it is possible to filter by the three main channels of Citizen, Third Party or Contractors. Thus, if you want to filter by the number of applications being accepted/ rejected from a service provider that assists in your service delivery it is possible to do so.

Export to CSV
The point of the reports is to provide a clear visual representation of your data. But sometimes you may want to get into the most granular level of the data. To provide this, one can export the data into CSV for viewing and further extrapolation/filtering. This is done using the Export button on the right hand side of the screen:

When the export option is clicked the export is presented for download:

The best way to access this to right click the item and then select ‘Save link as…’ (Note this may be ‘Save Target As’ in other browsers):

Save it to your desktop or to a folder you have specific for these reports:

Once it is present on your pc, right click on the item and select ‘Open With’ and choose Microsoft Excel.
As you can see within here one can see both the Payment Reference and the Case Reference linked to it – something we have built in specifically following customer requests for this link:

* Note that standard MS Excel functionality was used to format it like above.
Award Analysis
The Award Analysis report is just like the Payment Analysis report except that it visualises the information as awards rather than monetary amounts:

Decision Analysis
Decision Analysis provides one with the ability to view the outcome of decisions broken down into whether they were accepted/rejected and also auto-accepted/auto-rejected:

This report also provides an extra filter, which is the Decision Types filter:

This filter enables you to report upon the decision outcomes that are set up against components.
Decision Performance Analysis
We wanted managers to be able to see performance for all staff as well as at individual user level. The following shows the performance in red (which is actual components assessed) as well as the time taken to process these cases. With a fastest/slowest and average time built in too:

To view the performance (only in terms of time to process) one simply needs to remove the Component Requests option:

It is also possible to change the Query From and To dates so as to be able to Filter by individual days/weeks:

The performance report is the mostly likely report where one would filter by user and this is shown below for a specific user:

Claim Analysis
One of the elements we have been asked most about is the ability to extrapolate data held within the system to establish demographical information. Moreover, since inception the reports have been driven by component decisions and so without using Microsoft Excel, one could not get the high level claim information. Claim Analysis provides solutions for both of the above.
The report now allows a user to see the:
- Total number of claims received (in the period selected)
- Number of claims accepted (in the period selected)
- Number of claims partially accepted (in the period selected)
- Number of claims rejected (in the period selected)
The report is shown here where the total is shown at the head of the report and the values/
% of each decision type can be seen by hovering over an area:

If one is only interested in accepted cases then it is just a case of unchecking the other decision types in the legend/key of the chart:

Where the power of the new report really shines however is the huge array of new filters that are available on top of those that were pre-existing. It is possible to now filter upon:
- Claimant Age Groups comprised of:
- Under 25
- 25 - 39
- 40 -65
- 65+
- Household make up comprised of:
- Single claimant
- Couple
- Lone parent
- Couple with children
- Cases with a Non-dependent present
- Tenancy Type
- Claimant Status (i.e. the statuses that can be set against a case - Disabled/Student/SMI )
- Claimant Gender
- Religion
- Ethnicity
- Sexual Orientation
So as an example if one wanted to see the number of claims, which were rejected for:
- Female lone parents which were:
- Under 25
- In Private Tenancies
- Christian
- Heterosexual
- White British
Then this could be simply established using the filters in place. Moreover, using the export to CSV function one can get to the specific cases in this client group.
Note we have also added National Insurance Number into this export to facilitate comparisons with other systems.
Appeal Analysis
Whilst this report was not requested by sites, we wanted to ensure data for all decisions types could be viewed in the reporting area. This new report is shown here and works just like the other reports:

Functions to prevent user error
There are inbuilt elements to ensure there are no issues with reporting. The following shows the alert that is presented where the view is Daily and the person has attempted to view the data for more than one month. When this happens the report will auto-correct to the current month’s dates:

This error will be presented when the To Date is before the From Date:

This error will be presented where the user puts in a non-sensical date i.e. 31/04/2013:
